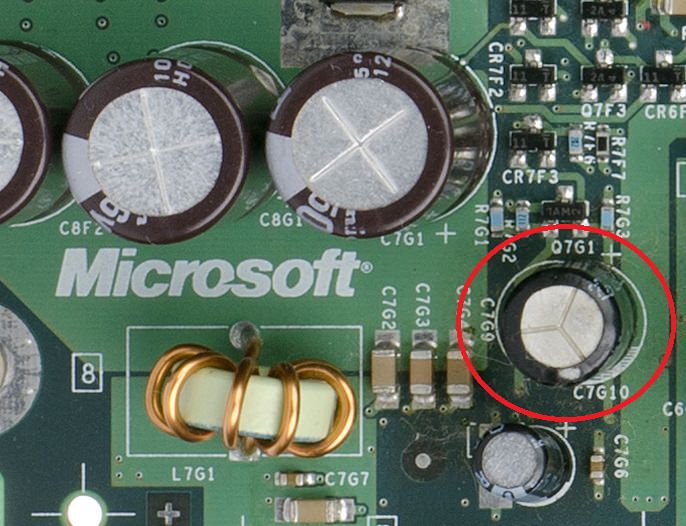
Clock Capacitor Removal (v.1.0-1.5)
Intro
Follow this step-by-step guide to remove or replace the clock capacitor on an original XBOX.
Links for the required tools & materials have been provided. Purchasing via the links below supports Restoreo through commission we earn at no extra cost to you.
Watch the video and tick off the steps as you go.
Disclaimer: this guide is for educational purposes. Repairs may void your warranty. Perform repairs at your own risk and disconnect from power before starting. We are not liable for damage, injury, or loss. Use proper safety precautions and dispose of components responsibly.
Materials Needed
-
Torx 10 & 20 Screwdriver
- Soldering Iron
- Flux & Solder (optional)
- New Clock Capacitor (optional) - XBOX v1.6 only
Video Guide
Step 1
Test the XBOX:
Power up your XBOX and play a game for a few minutes to ensure it's workingStep 2
Prepare your workspace:
Ensure your working on a clear, clean, and tidy workspace - a repair mat isn't essential but can be a worthwhile investmentGather the required tools
Step 3
Open the XBOX housing:
Flip your XBOX over and carefully lift the rubber feetRemove the six T20 screws - you can find 4 under the feet and 2 under the stickers
Once the 6 screws have been removed, flip the console back over
Lift the console housing up to remove the top chassis
Step 4
Remove the DVD & Hard Drive:
Locate and remove the 3 T10 screws holding the DVD and Hard Drive in placeGently disconnect the ribbon cable from the Hard Drive and unhook the cables from the housing
Gently fold the Hard Drive over to the side of the console
Carefully lift the DVD drive and fold over to the opposite side of the console
Step 5
Identify your XBOX version:
Now you have access to the motherboard, locate the video chip (usually at the top, below the video output). See the image below for reference:
You can identify the version number by looking at the markings on the video chip. See the below options to help identify your XBOX version:
Conexant - v1.0, v1.1, v1.2, v1.3
Focus - v1.4, v1.5
Xcalibur - v1.6
For v1.0 to v1.5 - you can simply remove the clock capacitor without replacing it, however, keep in mind that doing this means the XBOX will notify you to set the time upon power up
Alternatively, for v1.0 to v1.5 - you can remove the clock capacitor and replace it with a new one, which means the XBOX will keep time
For v1.6 - you must replace the clock capacitor and follow further steps (not included in this guide)
Step 6
Disconnect the cables from the motherboard:
Locate the DVD drive ribbon cable and yellow cables connected to the motherboardUnplug the ribbon and yellow cables from the motherboard
Unplug the left front port cable
Carefully unplug the large power cable (make sure you do not have your hand over the power supply)
Unplug the button cable (located below the power cable)
Unplug the right front port cable
Finally, unplug the fan cable (located at the top centre)
Unscrew the 11 T10 screws from the motherboard
Carefully lift the motherboard up and out of the console housing
Set aside the housing and its remaining components, so you can begin working on the motherboard
Step 7
Locate the clock capacitor:
Use the images below to compare with your motherboard and identify the position of the clock capacitorv1.0 - 1.1 clock capacitor location:

v.1.2 - 1.4 clock capacitor location:

Step 8
Remove the clock capacitor:
Use a de-soldering gun or soldering iron to cleanly remove the clock capacitorFlip the motherboard over and locate the legs of the clock capacitor on the board
Pre-apply flux to the legs to make the removal easier
Heat your soldering gun or iron to 380°C
Heat the solder around the legs of the capacitor until melted, then remove the melted solder using a de-soldering sucker (if needed). Finally, pull the clock capacitor gently away from the front of the motherboard
Once removed, inspect the area to ensure no residual solder or debris is left behind
If you are replacing the clock capacitor for new, then solder the replacement piece on now
Step 9
Reassemble the XBOX:
Carefully place the motherboard back into the housingScrew the 11 T10 screws back in place to secure the motherboard to the housing
Reconnect the cables and T10 screws to the motherboard in reverse order (refer to step 6 then step 4)
The motherboard, DVD drive, and Hard Drive should now be fully back in place with all screws reattached
Put the top console housing back in place and attach the remaining 6 T20 screws
Push the feet of the housing back into place
Step 10
Test the XBOX
Power on your XBOX
Load up your favourite game and test for as long as you like to ensure the system is functioning properly
You're done! Enjoy your refreshed XBOX
